Build a .NET library with GitHub Actions
- 5 minutes read - 908 wordsUpdated on
GitHub Actions are a great free tool to have continuous integration of your opensource .NET library for free, directly into GitHub, saving you from setting up other tools and linking accounts. Setting it up can feel a daunting task but, if you follow this guide you are going to be able to set it up in 10 minutes!
What will I achieve
Following these steps, you will be able to build and run tests, targeting multiple versions of .NET Core, reporting then the status to the Pull Requests.
Finally, when you release a new version (either creating a release on GitHub or pushing a new tag), it will prepare your NuGet packages and upload them on NuGet.org.

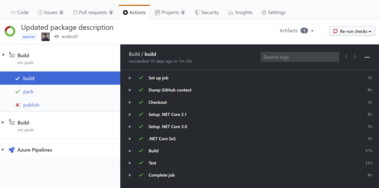
GitHub Actions
What are the prerequisites
This guide assumes that you are building either .NET Standard or .NET Core libraries. Tests are run multitargeting multiple versions of .NET Core, although that is not a requirement.
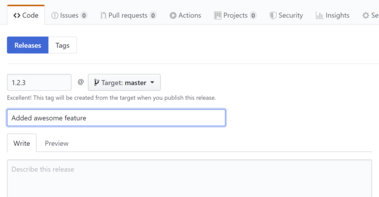
It also assumes that to release new versions of the library you will create a new tag (it can be done from the Releases tab on GitHub) with the version number as tag name, e.g. 1.2.3. To release a prerelease version you will use a prerelease name as tag, e.g. 1.2.3-preview.1.
As this build step will rely on dotnet pack to package your libraries, you need to make sure you are excluding all the test project, samples and other libraries you don’t want to package and publish to NuGet adding the property <IsPackable>false</IsPackable> to the csprojs or a Directory.Build.props file.
Note: when using a Directory.Build.props file, as these builds will run on Linux agents, the casing in the file name matters!
Here is a sample csproj file for a project to not be generated as NuGet package:
<Project Sdk="Microsoft.NET.Sdk">

  <PropertyGroup>
    <TargetFramework>netstandard2.0</TargetFramework>

    <IsPackable>false</IsPackable>
  </PropertyGroup>

  <ItemGroup>
    <PackageReference Include="Microsoft.Extensions.Logging.Abstractions" Version="3.0.1" />
  </ItemGroup>

</Project>
Ok, show me the code
Create a file in a folder .github/workflows named build.yml with the following content:
| |
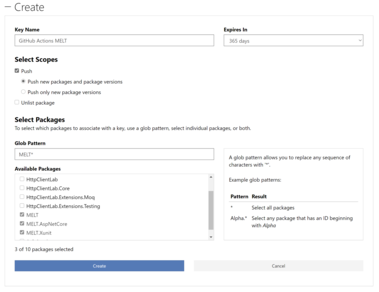
Then go into your NuGet.org account, navigate to API keys and create a new key.
If for example your project is called MELT and it is Generating a package called MELT and one called MELT.AspNetCore, you could call the key GitHub Actions MELT and setup the glob pattern as MELT*.
Note there is no . before the *, otherwise, the MELT base package will not match.

Create a API key on NuGet.org
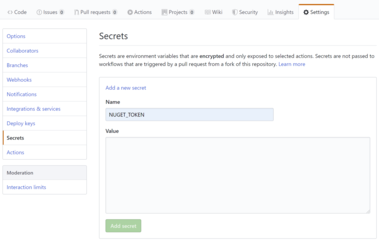
Then go into the Settings of your GitHub project, then on the left navigation menu select Secrets, then Add a new key and name the key NUGET_TOKEN.

Add a secret to GitHub
Done!
Now you just have to push the build.yml to master and, after that, all the new PR (or new pushes to pre-existing ones) will start to build and attach the status to the PR.
When a PR is merged to master, it will also create the packages (with a temporary pre-release version, not strictly following SemVer however that doesn’t matter as this packages are not published) and upload them as artifacts in the build results in GitHub Actions so that you can check which packages have been created and download them if you need to verify something.

Download artifacts from GitHub Actions
If you are happy, you can then create a release, so that the actual packages with the correct version number will be generated and uploaded to NuGet.org.

GitHub create release
Happy building!
Appendix: change version of .NET Core
This article assumes you are running the tests against multiple versions of .NET Core, specifically .NET Core 3.0 and 2.1, so it is installing the .NET Core SDK 2.1.607 and 3.0.101. If you need to change those version, you have to both update the version in the steps to install the SDK as well as in the rsync command in the .NET Core SxS step at line 29 of the build.yml file shown above, which is a workaround to overcome the current limitation to install multiple versions of .NET Core in GitHub Actions.
