Now that the Windows 10 May 2020 Update is finally available to everyone, without requiring to join the Windows Insiders program and install preview versions, it’s finally time to embrace WSL2.
WSL2 is the second iteration of the Windows Subsystem for Linux which finally allows running linux virtualized inside Windows.
This new version brings real virtualization using a real linux kernel, but, compared to a traditional virtual machine, it runs on a lightweight hypervisor getting close to bare-metal performance.
This will also be used by Docker under the hood, boosting the start-up time and general performance of our containers. Sweet!
Furthermore, with WSL2, VPN connections automatically propagate to linux correctly, which is great news when working from home.
So, let’s stop talking and get to update our Ubuntu 18.04 WSL environment to Ubuntu 20.04 running on WSL2.
The first prerequisite is to have the Windows 10 May 2020 Update. If you haven’t got the update yet, head to Windows Update and check for updates.
No luck? Not to worry! We can manually get the update with the Windows Update Assistant. Microsoft does a good job of burying it beneath a long list of pages that suggest you run Windows Update, but I’ve got the link for you.
Head to the Windows Update Assistant download page.Windows Update Assistant download pageRun the update assistant and I’ll see you back in an hour. 👋
Let’s start by opening an elevatedPowerShell 7 prompt.
A regular Windows PowerShell or Command Prompt would do just fine, but why not use the new cross-platform PowerShell version?
Pro Tip: to quickly run it, you can hit WIN + R to open the Run dialog box, then type pwsh and press CTRL + SHIFT + ENTER to run it elevated.
If you don’t have PowerShell 7 installed, grab it directly from GitHub while it is still hot! Scroll to the bottom of the 7.0.1 release page, download the 📦PowerShell-7.0.1-win-x64.msi and install it.
Now from the elevated prompt, let’s ask Windows to kindly install the required virtualization component.
On this guide, the commands you have to enter on the PowerShell prompt starts with >, while the following lines represent the output of the command.
Of course, you will have to omit the initial > when typing the command.
Later on, when we will switch to the WSL linux prompt, comamnds will be indicated starting with $.
If you see the above outcome it means you probably had it already enabled. Great!
If you get, at the bottom of the screen, a message that you need to restart Windows to complete the installation, bookmark this link so you will be able to jump directly to the next step once you are back. See you in a bit.
Now that we have enabled the Windows virtualization feature, we can now enable WSL2. Let’s open our PowerShell 7 prompt, no need to be elevated this time, and issue the following command:
First things first. I’m pretty sure I don’t have to explain how important it is to always have backups, but this is especially true before upgrades.
Even if all the data we have inside our WSL installation are already backed up, we want to create a full snapshot so we can quickly get back to a working state if anything goes wrong, This will also allow you to quickly restore the current setup and run it side by side if you ever decide you use to like it more (but trust me, you will not want to go back!).
Let’s now go back to our prompt and list the installed distributions on WSL. If we have Ubuntu, it should be called… have you guessed? Ubuntu!
Let’s also make sure that the state is Stopped. If that is not the case, verify that we don’t have any WSL prompt open, then issue the following command, then use the previous list command to verify that it is now terminated.
❯wsl-tUbuntu
Ok! we are not ready to create a backup. This next command will create a file called ubuntu-backup.tar.gz in the current folder. You can customize the filename to your like and eventually specify a path.
In PowerShell, to specify a path you can either use \ or /, just make sure to enclose the path in double quotes if you have spaces).
>wsl.exe--exportUbuntuubuntu-backup.tar.gz
If you want to play it safer, you can also copy this archive to your preferred backup location.
That was easy! Now we can boot our Ubuntu on the kernel we previously installed, getting all the befits of WSL2.
To boot it up, we can either:
Type wsl at the PowerShell prompt
>wsl
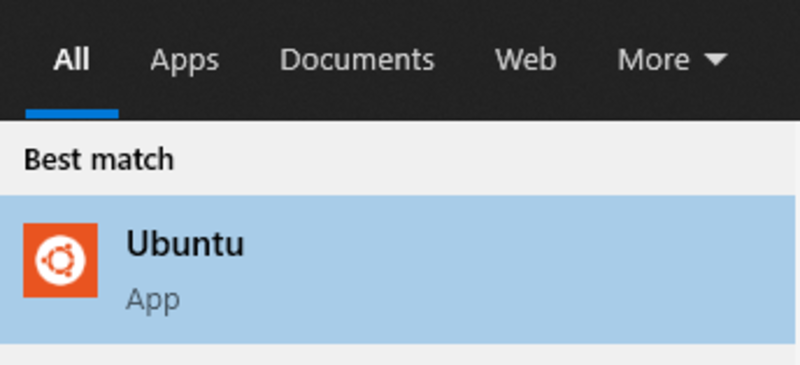
Start it up from the Windows Start menuUbuntu on Windows Start Menu
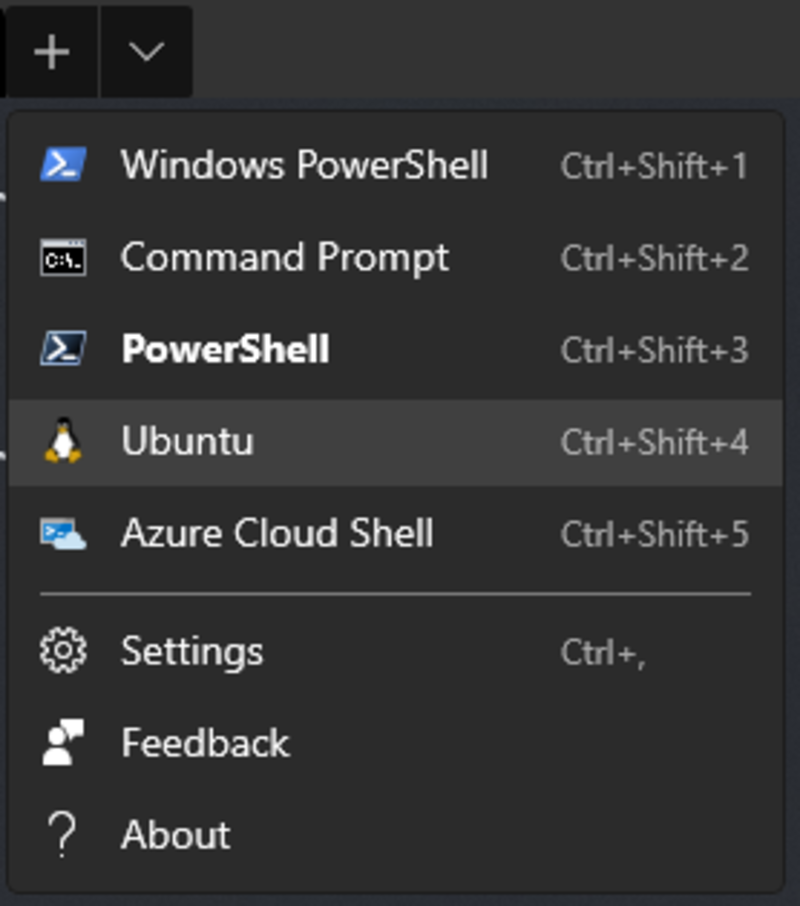
Open the dedicated Ubuntu tab in our shiny Windows Terminal. If you don’t have it installed, you can get it from the Windows Store. If you are not logged in and are prompted for an account, you can dismiss the prompt to quickly proceed to the installation.New Ubuntu tab on Windows Terminal
Once we are into Ubuntu, let’s start the upgrade to the latest release: 20.04 Focal Fossa.
Trivia: Ubuntu version code names are made of an adjective and an animal name using the same letter, each version using the following letter than the previous one. This is the second cycle through the alphabet.
Reminder: on this guide, the commands you have to enter on the WSL linux prompt starts with $. Of course, you will have to omit the initial $ when typing the command. The following lines without the $ sign represent the command output.
$ sudo do-release-upgrade -d
Before it starts the actual upgrade it will give us a bit of information.
For example, we could get this message in case we had installed software from third party repositories, but it is nothing to worry about, we can re-enable them later if needed.
If that happens, just press enter.
Third party sources disabled

Some third party entries in your sources.list were disabled. You can
re-enable them after the upgrade with the 'software-properties' tool
or your package manager.

To continue please press [ENTER]
Then we will get a report on how many packages need to be upgraded and how much data will be downloaded.
Do you want to start the upgrade?


4 packages are going to be removed. 134 new packages are going to be
installed. 482 packages are going to be upgraded.

You have to download a total of 192 M. This download will take about
24 minutes with a 1Mbit DSL connection and about 7 hours with a 56k
modem.

Fetching and installing the upgrade can take several hours. Once the
download has finished, the process cannot be canceled.

 Continue [yN]  Details [d]
Type d if you want to see the list of packages, then go back with q.
To proceed, press y then enter.
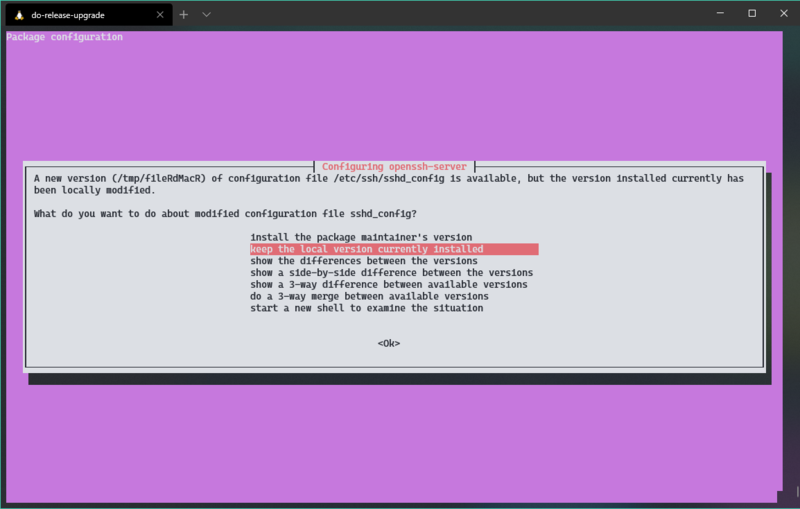
During the process, we are probably going to be notified of a conflict updating the OpenSSH config.
The configuration conflict screen
The installer suggests us to keep the local current version, to play it safe. However, if we know we haven’t done any changes intentionally, we can install the package maintainer’s version, to get back to the default configuration, which has also the advantage of having future upgrades go smoothly.
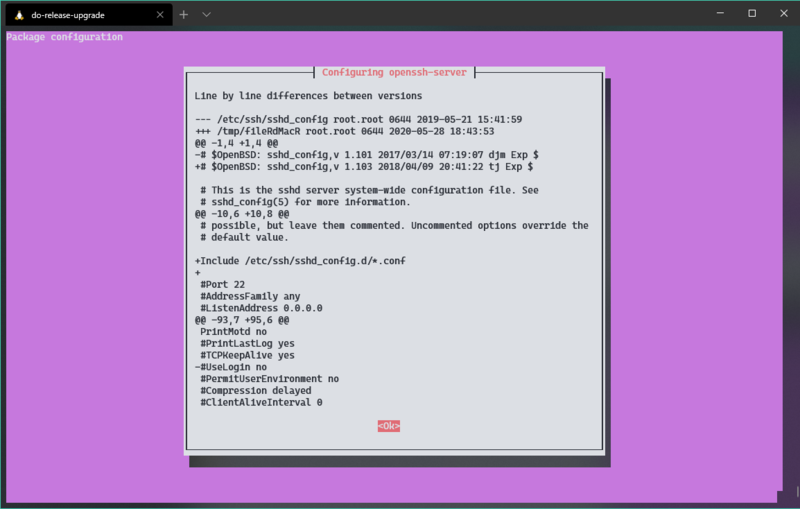
In any case, we should first check what are the differences, selecting show the differences between the versions: the lines removed will start with -, while the lines added with +. The @@ lines indicate a missing portion of the document as not relevant because unchanged.
The configuration conflict diff view
In the above screenshot we can see a few changes:
the initial comment (in config files the # character is usually used to identify comments) at the beginning of the file, with the configuration template version information, has been updated
there is an addition of Include /etc/ssh/sshd_config.d/*.conf. What this does, it would load the configuration form eventual extra files on that path. This is quite a common pattern to modularize the configuration on linux systems.
the #UseLogin no line has been removed. As this was already commented out, it makes no difference to remove it. The reason for the removal is because this configuration setting has been removed in OpenSSH 7.4, so it makes no sense to leave it commented out in the file. The reason to have common settings commented out is to make it easy to enable those settings, as you just need to remove the # character to uncomment it instead of looking up the exact spelling of the setting in the manual.
Let’s go back confirming with enter on the highlighted Ok and, unless you have some extra changes you want to keep, you can proceed with Install the package maintainer's version.
Once this is completed, it would ask us to remove obsolete software. These are packages that are no longer needed or have better replacements, so it is usually a good idea to get rid of them.
Searching for obsolete software
Reading state information... Done

Remove obsolete packages?


64 packages are going to be removed.

 Continue [yN]  Details [d]
As before, type d if you want to see the list of packages, then go back with q.
To proceed, press y then enter.
And this was the final step, we are now going to be greeted by the completion message!
System upgrade is complete.

Restart required

To finish the upgrade, a restart is required.
If you select 'y' the system will be restarted.

Continue [yN]
As WSL is not a real virtual machine, it can not reboot itself. So let’s cancel the reboot by pressing N or enter.
When a letter in a multiple-choice prompt is upper case, it means that it is the default action when continuing with enter.
Once we are back to the prompt, let’s exit with the command, you guessed it, exit.
$ exit
The sequence CTRL + D is an equivalent for exit in most linux shells.
Now from a PowerShell prompt we need to verify that WSL has been stopped. This happens automatically when the last process is closed, but let’s confirm it.
We can also verify that we are running on the new WSL kernel.
$ cat /proc/version
Linux version 4.19.84-microsoft-standard (oe-user@oe-host)(gcc version 8.2.0 (GCC))#1 SMP Wed Nov 13 11:44:37 UTC 2019
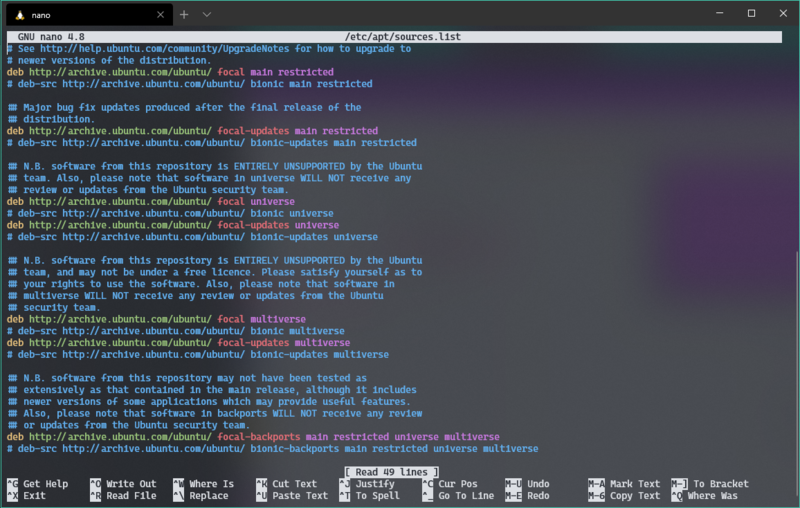
Remember that at the beginning of the upgrade process we have been informed that the third party sources would have been disabled?
Let’s check the package sources!
sudo nano /etc/apt/sources.list
Editing /etc/apt/source.list
This file contains the repositories to use when downloading packages. We can review it scrolling with the arrow keys. Ignoring the comments, identified as usual by the # sign, we are going to find various entries which have been updated to point to focal, which is the codename of Ubuntu 20.04.
We can then exit with Ctrl + X as indicated in the bottom left corner by ^X as ^ indicate the CTRL key.
While all the installed software coming directly from the Ubuntu repositories has been automatically updated, software installed from third-party repositories will require to point to the repositories for the correct Ubuntu version, and then update the software.
In recent years, to set up third-party repositories it is no longer necessary to manually edit configuration files, but it has become quite common to simply install a deb package.
deb is the package format for application distributed for the Debian linux distribution, which is also adopted by Ubuntu as it has been derived from Debian.
For example, if we had installed the .NET Core SDK from the Microsoft repository, we should now install again the repository with the following two commands. Note that the URL contains 20.04, our Ubuntu version.
Now that we are done with our Ubuntu upgrade, let’s move to Docker 🐋.
As we mentioned at the start, the new iteration of WSL also brings better docker start-up time and general performance, so it’s time to jump aboard the Docker on WSL2 speedboat!
Or should I have said sailfish? I am not sure what is the best metaphor when the Docker containers whale gets faster… let me know in the comments if you have a suggestion or reach out on twitter @AleFranz.
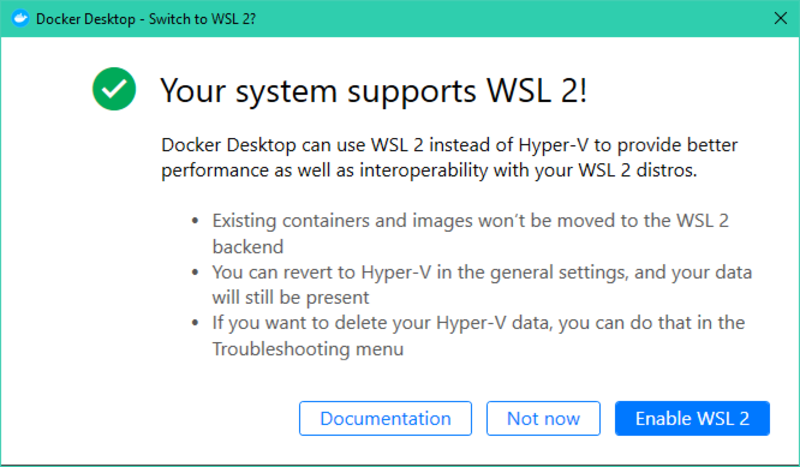
Let’s open the Start menu and start Docker. We should be greeted by a prompt to switch to the WSL2 based backend.
Docker Desktop prompt to switch to WSL2
Let’s confirm to Enable WS2.
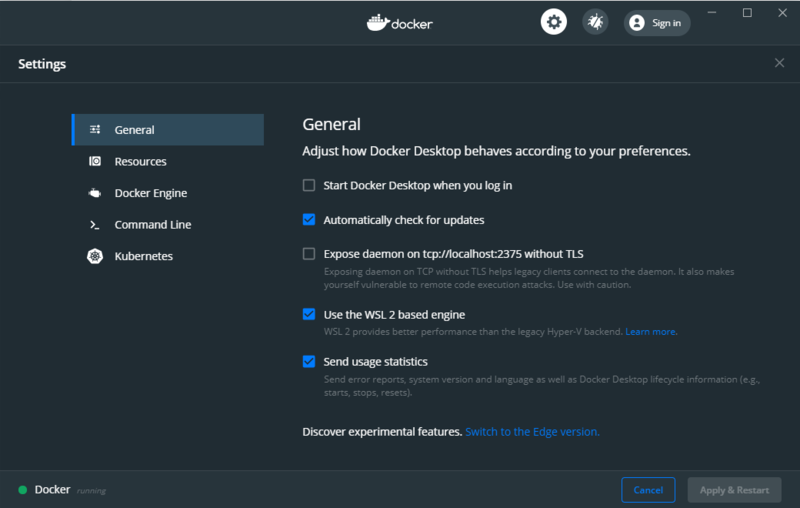
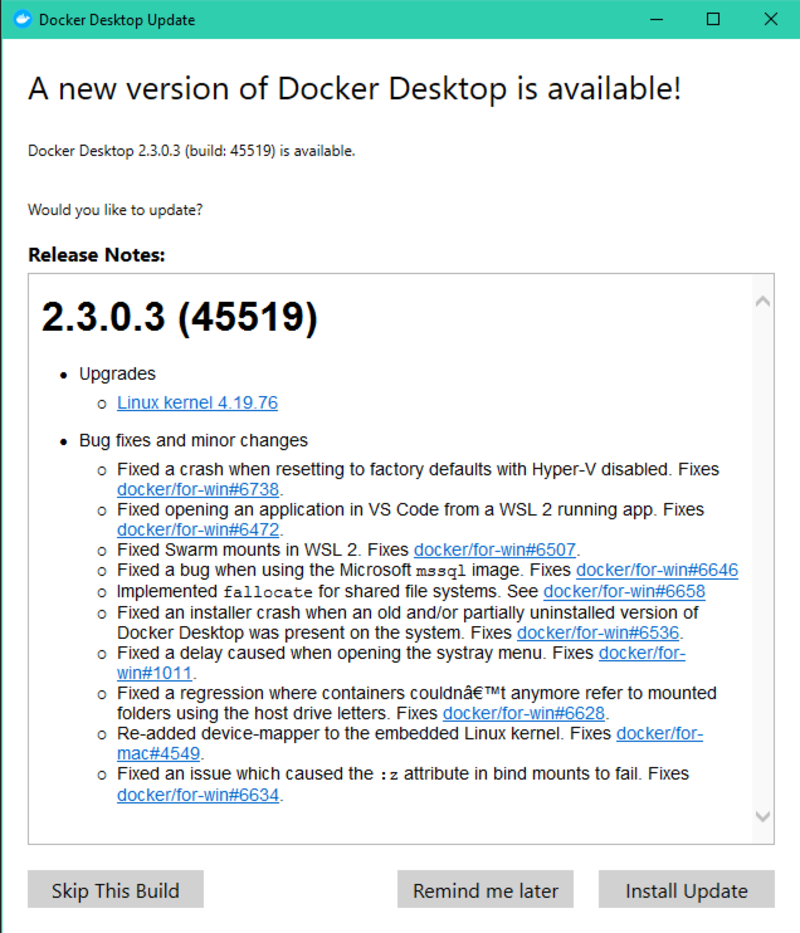
If you had Docker Desktop already running, you have to first close it to get this prompt. Otherwise, you can always right-click on the system tray Docker icon, select Settings and, from the General tab, tickUse the WSL2 based engine, then confirm with Apply and Restart.Docker Desktop settings windowIf the setting is missing, you need to update Docker Desktop. As the version check is usually done automatically on start. If it was already running, first close it with a right-click on the system tray icon, then Quit Docker Desktop. Start it again to be greeted by an update confirmation screen, then accept clicking Install Update.Docker Desktop update prompt
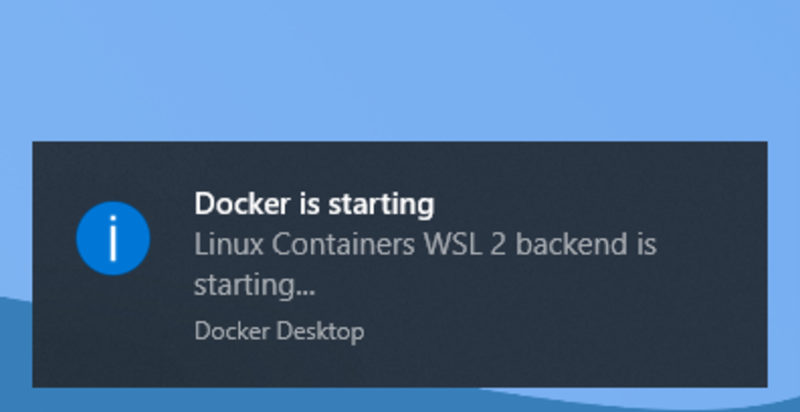
We should now notice a toast notification that Docker Desktop is starting and using the WSL2 based engine.
Docker Desktop starting with WSL2 backend toast notification
If you have followed up to this point, thanks for sticking with me. I hope you will enjoy your brand new Ubuntu and fast Docker performance.
Any issue, let me know on twitter @AleFranz and I will be happy to help.
Enjoy WSL2!
Don’t forget to follow me as I have some new post on how to use it at best coming soon!